Sunday, May 25, 2008

More on Alignment

It is apparent when one reviews the various trike forums that wheel alignment is an acquired skill... and in the meantime, the bike tire companies are making $'s for every mile traveled on poorly aligned recumbent trikes.

Honestly, a trike can be way off in alignment and all will feel just fine. So you work a little harder... that is why we ride anyway, right?

Today was again the norm for the Pacific Northwest... rainy, so I became industrious and checked the alignment on the 2 trikes in the family. This will be a photo shoot for PhattKatt... she's not shy!

First... do you have a spare tape measure lying about... in reasonable condition? Does it happened to have a small level indicator per chance? Well, if you do you have the perfect tool available for aligning your trike... with a few modifications, of course.

Second... are your wheels true? Do not continue if your wheels are a bit on the wobbly side. If they are, go down a lot of posts to see how you can set up a poor man's truing setup.

Third... I use the wheels to insure alignment. Most bike tires are not perfectly true once mounted. Tire Wows and Wobbles will throw off your measurements.

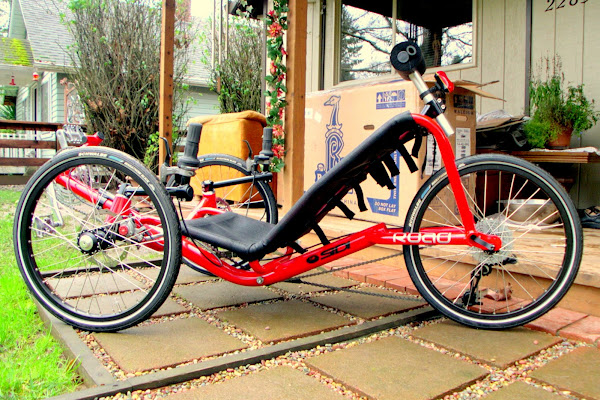
Please notice the setup of the trike. This is important; you need to know that you are level and that the trike is facing due-forward... meaning dead-ahead. I use the planks of the porch. The porch is reasonably level and the boards are consistent in width and spacing. This is perfect to making sure the trike is *square* when you do the adjustment:


Also notice the destruction of the tape measure. I cut the measure up in 4 length about 3 feet each. Each is in good condition without kinks or warps. Here is another distance shot [PhattKatt showing off!]:


In order to make this setup correct, remember a few *important* things about aligning you trike wheels: you *HAVE TO* remember to measure the same distance from the ground, front and back. That is what the lengthwise length of tape measure are for... and you *HAVE TO* find a place that you can measure unobstructed between the wheels. This understanding will give you a starting point for using the crosswise length of tape measure.

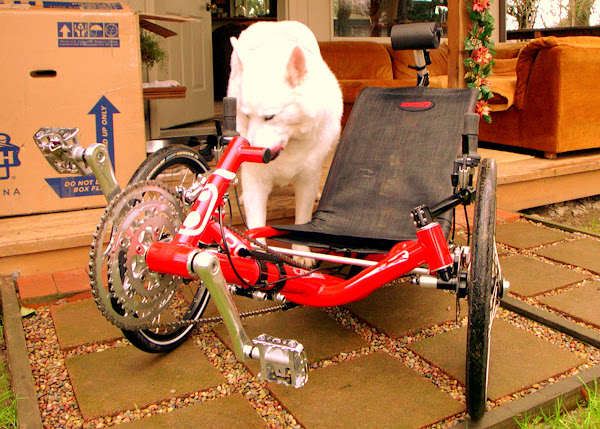
Take a careful look at this following image; notice the spokes are either inny's or outy's front and back. Same is true on the opposite side. This helps to make sure the lengths of tape measure sit flat and level. Also note the use of the bubble level to know when you are actually measuring level front and back as you should be. The level needs to be set on both sides to know you are fully squared up.


Also notice that a brake lock will come in quite handy to keep everything still while you're moving things about. If you haven't found a comfortable place for you to take the measurements on your Catrike, maybe this shot will help:


Now take a reading. The Sun rims have a nice tell-tale ridge right next to the spoke holes. I measured 71.8mm on both front and back against this ridge. This meant the trike was aligned.

But wait... you're not done. Now you need to check that putting your weight in the trike doesn't change this measurement. Some trikes change as much as much as 1/8" with the rider in the seat. If your trike does this, it is advisable to take the measurements with someone in the seat or at least a weight representing someone.

Although this setup uses a Catrike Road, all that is revealed here applies to all recumbent trikes. At this point, you need to go to your manual and determine how the alignment is changed. Every trike has a different method for making changes. And it goes without saying... remember to check that everything you loosened is tightened up again.

Disclaimer: This is only one of a million ways to set the toe on your trike. If this works for you also, great. If you have another way... also great.

Monday, May 12, 2008

Where's PhattKatt Been?!

Now that PhattKatt has her fur groomed, her claws trimmed, and all her pretties proudly preened, there is little she does but roam and rest.

Today is a good day to share some of the places Catrikes prowl; enjoy.


Noble Woods Community Park

Thursday, March 27, 2008

Protect the Bits

Over the past few weeks, PhattKatt has stretched her claws around the vicinity. Here too, her rider seems to be taking on the personality of the little kitty. Note also the remainder of this post... how to protect the peoples near our trikes... and the trike itself, with one simple little well worthwhile add-on.

These things are not easy to find. Whether heavy duty or even cursory duty, they come on almost all Asian built bikes and recumbents... but try to find one on a USA built production machine. You can't... not even as an option. Of course, I am talking about a Bash Guard ~or~ Trouser Guard... a BMX indispensable!

With those gnarly teeth ready to bite... or scrape... or poke anything before it, I thought it a good idea to add this protection since PhattKatt's rider, my loving wife, has learned to lift the rear wheel... or even "stunt braking" on PhattKatt. I wonder if this dare~devil behavior is being passed on through osmosis.

So with too much searching and even considering importation from Taiwan, I decided that protecting the chainring was worth the $50- investment. And it comes in very nice bling colors as well. The Purely Custom Bash Guard [apologies if the site link is poor; you can Google purely custom and go to their mountain bike area under bash guard]

And now for the important bits... the pix:

Out of the Box: Note the ~included~ chainring bolts/adapters
This is the 130BCD version. Other sizes and patterns are available... and a lot of other colors.


This bash guard is rated for a 53T chainring. PhattKatt has a 52T large ring. Pretty nice fit, don't you agree?


...and it clears the Ultegra crank just fine. The guard is a bit thicker than I was thinking too. That makes it a force to be reckoned with.


From a distance, I think its bling value alone is well worth it... $40.95 plus S/H!

Saturday, March 8, 2008

As if it was Spring, but not yet

After many wet days, we started this day as a beautiful one, sunshine but still cold.

Today, PhattKatt and big Brother ABTT had their best friend, big white beast for a ride (the dog) around the neighborhood, afterwards, we left for a little ride around the Rock Creek Trail, this time we headed west from the trail to a new neighborhood, it feels like spring, bulbs are all blossoming ... Beautiful!!!! More people outside, more bicycles around.

After all the hard technical work, replacement of the gear and all testing, today was the test drive of the new stuff, worked very well, no more struggle to climb hills, all very nice and smooth, thanks Hubby for all the hard work :)

Today another nice ride, even with some clouds it was a pleasant ride ...


Saturday, March 1, 2008

Gearing Completed

A few days ago the rear cassette was changed form the stock 11-32 SRAM PG-970 to an 11-34 SRAM PG-970. This may not seem like much but in gear ratios, it is quite a bit on the bottom end.

Remember that the last change was to replace the 30T chainring with the 24T chainring. That accounted for a 20% gear reduction. The change from 32T to 34T on the rear cassette represents another 6%. The end result is that PhattKatt now has a low end of 13.2 gear inches which is considered very low... low enough that most 2 wheel'd cycles would wobble and fall over. 3 wheels are great!

Wikipedia has a quick reference for what gear inches really means HERE

In short, gear inches shows what the virtual size of the wheel would be in terms of diameter. In PhattKatt's case, 13.2 gear inches means it is like pedaling a wheel with pedals attached to its axles and the wheel would be 13.2" in diameter. It also means that each full turn of the pedal at this ratio is 41.5" of forward motion [PI*D].

Here is PhattKatt's final gear inch chart:


Please note the crossed out ratio's. There is a limitation to the rear derailleur known as Chain Wrap Capacity as stated before. This particular rear derailleur has a chain wrap capacity of 45T [T=teeth]. This is typical for long cage derailleurs. In PhattKatt's case, we have now exceeded the chain wrap capacity by 6 teeth. To calculate this, note the difference between the cassette's smallest and largest gears and the chainrings smallest and largest gears. PhattKatt has a cassette of 11T to 34T, or a 23 tooth difference and the chainrings are 24T and 52T, or a 28 tooth difference. Add the two and you get 23+28=51 teeth... now subtract the 45T capacity and you get 6 teeth over the recommended capacity for the SRAM X-7 rear derailleur.

Take a look at what happens at the rear derailleur as we go through the gears:
[click on the image to go to the animation]


The other *mystery* to rear derailleurs appears to be chain length sizing. This is specifically important to recumbents because most recumbents allow you to adjust the placement of the pedals via the boom. Changing the boom will affect the chain length, and therefore also affects the rear derailleur significantly. Maybe the next part of this post will make it clear why this is so.

You know those fine print rice paper pages that are often included with your new bike bling? They have microscopic words on them and little caricatures that kinda look like bike stuffs... and sometimes you can recognize certain words that look like "WARNING"... "CAUTION"... and "DO NOT!"... but you are to excited to ever bother to find out what they mean? Well, this is one of those explanations.

When sizing the chain on a recumbent bike you MUST understand the ramifications of doing this wrong. Errors here could mean catastrophic failure up to and including serious injury. You don't have to take my word for it as many others have posted similar warnings which often go unheeded. You've now been warned again... so let it be said... Follow the manufacturer's instructions! ....and you can always find them online so you can enlarge the fine type to a legible level. Here we will discuss the SRAM Rear Derailleur instructions as they are applicable to PhattKatt.

SRAM states that when sizing the chain for the rear derailleur, you must size the chain by wrapping the chain around the large chainring and the large cassette gear and bypassing the rear derailleur. You want the chain to be taught when doing this. Now add 2 links to the chain. 2 links means 1"... one outer and one inner link. This will provide sufficient deflection for routing the chain through the rear derailleur and still have the full chain wrap capacity as your rear derailleur was rated for. Failure to follow these requirements, and allowing for a situation where the chain would be to short for the large/large gear combination can and will cause drive system failure which can have catastrophic effects up to and including injury! It is way to easy to brain-fart that bad combination and the drive system is all to happy to try to oblige your control command into this self destructive behaviours. Just don't do it!

Below is a picture of how the derailleur looks on PhattKatt in the 3 different chainrings while on the largest cassette gear:


In short, always make sure your chain is long enough! When adjusting the boom for a friend, resist the temptation to lengthen the boom unless you are willing to dial out the top [largest] chainring form the front derailleur. This is easy to do with the limit screw on the front derailleur.

Also note that I have exceeded the manufacturer's recommended Chain Wrap Capacity with the gearing I've chosen to accept on PhattKatt. Doing this means you have some understanding and control over the way your trike is being used. I would NEVER recommend anyone do such modifications without careful consideration and understanding the ramifications of doing so. I personally feel that on PhattKatt, this is an acceptable risk.

If lowering your gearing is needed on your trike, consider replacing your crankset to remain within the manufacturer's derailleur's chain wrap capacity. A simple solution to lowering your gearing for climbing is to purchase a crankset with 22T/34T/44T chainrings. This will provide the appropriate chain wrap capacity with your 11-34 cassette.

Until next time, keep the rubber side down.

Sunday, February 24, 2008

Another Day of Surgery

Today was a big day for PhattKatt as more upgrades were fitted to the little kitty's body. Today's surgery involved the PhattKatt's very reflexes... messing with the drive line.

The first upgrade started over a week ago by obtaining true Teflon tuning. Experience has shown that Teflon is the perfect material for guiding bicycle chains as long as the taught side of the chain always runs in an arrow-straight line. So the first challenge was to straighten out the tubes delivered from a spool and rolled up in a box. Turns out that placing the curled 1/2ID; 1/16" wall tubing in a large PVC tube while blowing a hair dryer on full heat through the tubes would relax the material enough to straighten itself out. Once cooled, the tubes maintained a pretty straight profile.

Today, the tubes were flared with a tapered grinding bit in the drill press and a coned grind stone in the drill. Only the entry sides of the tube requires a prominent flare but all 4 ends were rounded to some extent. The slack side receiving end got the best flare as you can see in the pix below. Each tube length can be best optimized when you know where the trike or bike boom will be set. In this case, the boom is set to the shortest position it can go. This is a picture of the tubes ready to install:


Here is a view of how the insides of the Teflon tubes look:


Even after years of use, these tubes will look nice and shiny and they will wipe clean by running a cloth through the tube. People have complained of noise with these tubes. I can't detect any.

I haven't told you yet why we are doing this... seems a lot of bother, no? Just wait, the bother has only just begun, but let it suffice to say that these are the modern edition of chain guards. These are installed to keep the ever popular chain tattoos away from your legs and your cloths. Having had excellent success with these on the *other* trike, PhattKatt is certainly deserving of having the same treatment.

From afar, it seems a simple thing to add; put tubes over the chain your done... right? NOT! The art is in making sure the chain tube will stay on place. This is easy for the slack-side chain; we use a tube clamp... and we also put a tube clamp on the power side with a few caviats. Trick here is to make sure that the tube is directly in line with the chain while in all three chain rings. The key is to make sure that you capture the tube near the idler since that is where the deflection is least. In the following series of pictures, you will see a lot happening on the idler axle. From the outside inward, you have: a) tube clamp for the slack side tube b) the chain keeper that keeps the chain from falling off the idler c) the idler d) a flat plate [bracket]; which holds the tube clamp; which holds the power side chain tube. I've provided lots of images in hopes that these references will help you determine the best way to implement these in your application:


You can imagine how this area could foul pretty easily. Indeed, it is an area that gets the regular once-over and general maintenance. When something goes wrong in this area, you know it pretty quick. I don't see how it can mess up to such an extent that it will be completely disabled, though.

The results are spectacular. After all this careful work, these tubes are carefree as they simply allow the chain to glide along and a major portion of the messy part of cycling has been held at bay. The entire power side chain tube floats from the one tube clamp at the idler, which was carefully adjusted to make sure that the chain goes into the tube unhindered from the idler. If you look carefully at the next image, in the lower left corner, the slack side chain tube has been captured with a pair of zip-ties around the trike's cross member [from the left side] to help manage this tube, and the chain, in left hand turns. This particular tidbit is also from experience. Have a good look at how it all ended up:


Surgery one accomplished... but wait; we're not done. We still have a chain ring to replace. We learned that PhattKatt has a pretty high strung gear train. So we're going to calm down the climbing gears. This is a 2 part operation where the first is to replace the 30 tooth [30T] with a 24T chain ring. Here is the gear chart that we are aiming for:


We will be adding two more teeth to the rear cassette to get to the 13.2GI [gear inches] but let it suffice to say that the swap of the 30T gear for a 24T gear is providing a significant change. In preserving the larger chain rings, we have not sacrificed any of the top end gearing as was the consideration with the chart. Take another look at the image above for how small that little 24T chain ring looks in the chain ring set! Here is a shot after changing out the ring on the crank set off the trike:


One consideration often talked about on forums, with my vocal input as well, has been dispelled as myth today. Specifically, when you exceed the chain wrap capacity of the rear derailleur, the derailleur should cause the chain to crash into itself potentially causing problems. This means that when you exceed the chain wrap capacity of the rear derailleur, you need to avoid certain gear combinations. The SRAM X-7 rear derailleur is a 45 tooth chain wrap capable derailleur. I have now exceeded that capacity by 4 teeth. But look! the X-7 doesn't have enough return spring to lift the long length of the recumbent chain high enough; it just goes slack! This certainly is not true for all rear derailleurs but in this case it is an interesting phenomena. I'll let the two pix talk for themselves as the chain is on the 11T cassette cog and on the 24T chain ring:


So we still have the 11-34 SRAM PG970 cassette to put on PhattKatt. This will involve splicing in a longer bit of chain. Everything is on the bench; just gotta do it. We'll let you know how that goes as well. But for now, time for the mechanic to rest.

Over and Out.

P.S. when viewing larger images by clicking on the pictures, if you change the *...s800...* in the web address to *...s1600...* you get the larger images just in case you want to see more detail. One of those hidden little blog secrets.

Saturday, February 23, 2008

PhattKatt Climbing Hills

Hello, here is the one who rides the PhattKatt ... The hubby does all the technical work and I just enjoy the rides ...

Today the ride was tough, my knees hurt when we do some hills climbing, actually everything hurts after the ride. The Phattkatt is comfy, but has to have more adjustments (hubby job!! Ah Ah!!!) so, it won't be as hard for the old body!!!

The ride was nice, good weather, lots of green, some nice smiley people walking on Rock Creek Trail, some nice drivers in the roads and some not too nice drivers.

Another day of fun ...

Sunday, February 17, 2008

Spring is in the air!

I know what you're thinking... but this has nothing to do with the birds or the bees.

Well, maybe in the fact that all these things seem to have come to life today. Our warmest day of 2008 and we were out in it! A nice 14 mile gentle wandering thoughout the burbs with some splendit visions from afar.

BTW; PhattKatt behaved perfectly enjoying a quickened pace and clear blue skies.

Some of todays caps:


Route


The great Blue Heron


Pacific Northwest Coast Range


Mount Hood

Saturday, February 16, 2008

To serve a purpose.

After all the fussin' and futzin' in getting PhattKatt all prep'd and prop'r, the days are finally becoming longer and that warm ball in the sky is peeking form between the gray matter overhead. These things in the macrocosm of course awaken the same emotions in the microcosm within as the sheer joy of riding trikes through the suburbian terrain is part of spring's awakening.

Today's route was tracked on the MotionLingo Adeo. A GPS workout aid what can record your route for later download. Pretty simple to use and provides online workout tracking, workout data for analysis including elevation and speed, and much more. Today's was transferred to Google Earth for review.

Here was today's route: 10 miles at a very casual pace... most excellent to share with your S.O.!


Learn more about the Adeo at http://www.motionlingo.com/ .
Feel free to ask questions about the Adeo if you like.

Think we can do it again tomorrow? I hope so!

Sunday, February 3, 2008

Faith Rules!

Faith... a pregnant word with unlimited implications. But today at least the word had definition: Faith in the weather; that the gleam of light should hold long enough to fully awaken, prepare and consume breakfast, and roll the machines out into the environs without the fates forcing rain from the skies.

Indeed, faith held dear for these events and the events to follow. Today PhattKatt wandered nearly 10 miles into the City Proper via the various byways that lead there. First the batteries in the camera failed to work and the battery in the Adeo wasn't charged enough to even get going. So today would be all about enjoying the sights. And wonderful the play in the skies was. Menacing dark clouds were dancing with the fluffy light cloud while the Sun itself played peek-a-boo with the inhabitants below. Nothing much came of the clouds and little mind was given to the possibility of wet coming from them.

But before we left for today's trek, we did fit PhattKatt's paws with booties. Pretty simple mounting and squaring up but definitely a bit fragile in positioning. Nothing really holds the arm from twisting on top of the Cane Creek covers and over-tightening the bars didn't seem promising either. That's a lot of leverage for mounting on a domed surface. I left it as is for now but may just have to machine a few flat covers if the fenders stay. I did hear a few grumbles about not being able to back up by just pulling on the tires. But for now, it was worthwhile since we didn't knwo the conditions of the streets we would be exploring. I'm pretty sure putting the fenders on today was a good option. They sertainly come off easily enough it it is deemed "dry" on the next ride. Here's a shot of PhattKatt and her booties:


Several hours later, we made it back home. Bikes now clean, fresh and happily excersized. I wasn't quite happy with the Cateye OptiCube headlight. We don't ride in the dark, but the light only draws attention every so often and really wasn't doing what it was meant to do in daytime riding. I headed for the Performance Bicycle shop to get a floor pump. While there, I came across the ViewPoint Flare 5 on sale for just under $15-. The demo was nice and bright on its flash mode, much like my 5-LED Nashbar light on the "other" trike. Here a good look at it:


One thing I noted in the store is that the demo had a smaller bracket and a different button for the switch. I asked the sales-person what was up with that and they told me that the older one had problems with the switch. So be aware if you see one that doesn't quite match.

So now I know that PhattKatt will be noticed when she approaches intersection. Makes me a whole lot more comfortable. With the smaller lens, the light is also a little less vulnerable to foot strike.

I also noted that when assembling the fenders, I heard that annoying "snap" when tightening up the screws. Turns out I over-stressed the little plastic mount and cracked it. But this had its rewards as well: I learned that a) super glue doesn't work on these clamps... and b) Planet Bike has a WONDERFUL service where you can buy small parts for their products at their web site. Yes, I ordered spare clamps and ordered a few spare rods while I was at it all for $10-. And as if that wasn't enough, they will ship it FREE... YES, FREE! Have a look for yourself:
http://ecom1.planetbike.com/smallparts.html
...and the part that failed:
http://ecom1.planetbike.com/7009_4.html


I'm thinking that with a spare strut, I could secure the fender on the backside. With three mounting points, this should be a pretty secure mount.

[edit 2/6/08: The Planet Bike parts came in the mail today. Excellent service!]

On a side note: The Topeak bottle cage holder let loose today. Nothing broke, but when tightening the wedge that holds the angle, make sure it is well seated. If not, the whole kit-n-kaboodle will go crashing to the ground. Luckily the rider caught the water bottle and the other half of the clamp and wondered "what the heck!". Got the toolkit out and tightened it back in place and all was good.

Be safe!

Monday, January 28, 2008

More Bling!

I didn't tell you about our outing on Friday; a nice sunny trip along the Rock Creek Trail. One of Hillsboro's little feather in the Park Department's cap. Not a long trail but definitely worth mention. PhattKatt behaved marvelously!

Today, new bling in the mail! Yes... the people's of the Catrike forum were RAVING the N-Gear Jump Stop. Of all business models I've ever run across, this one is quite unique. Supply your address and the size of your derailleur post, and within a few days, you too will have a Jump Stop in your mailbox. I didn't mention payment yet, huh? That's right; like the way it works and pay just $10- or send it back. See the website: http://www.n-gear.com/ ...and Nick even accepts PayPal!

Here is a detailed look at what you get with the Jump Stop by N-Gear:


Installation was pretty darn simple. Even the nut is machined to help tighten up the clamp for a sturdy secure fit of the clamp and the jump guard. And the Allen wrench was even included! If you can't install this little device, you should throw away all your tools!

Provided below is a nice closeup view of the Jump Stop on the PhattKatt ['06 Catrike Road]:


I am quite certain that this $10-, if only ever needed once, will save me 10 times that much in residual grief. And this disclaimer is also necessary: I do not now, nor have I ever had and connection with N-Gear. I do support products and developers who make our lives better at a fair price.
Thanks Nick!


Peace Out!

Wednesday, January 23, 2008

S.N.A.I.L. mail...

I don't remember having to wait for parts as long as I've waited for the bottle cage mounts. Maybe it's just the cabin fever ...after all... the package did come all the way across the country. And it made it in one piece! Oh, yea... what harm can you do to a few pieces of aluminum in a box. Never mind, don't answer that!

First things first; the "other" trike got its bottle cage attached. Nice simple handle-bar mount for easy access. No more reaching over the derailleur post; Yippee!

As for PhattKatt, we found an interesting bottle mount adapter. Almost a by-product of a Topeak quick-mount system that could have a real niche in the recumbent fold. Take a look:


...and Package for recognition: [I've only seen this on amazon.com, BTW]


The horizontal stem is mounted onto the derailleur post similar to how the Minoura mount works but can only be attached in the orientation shown. This mount also comes with two strap lengths for different size posts.

It was a little unnerving tightening the strap as you really never get that "tight" feel. But you can easily tell when it is "tight enough". The angle of the upright bar can be adjusted. This system uses a old handlebar wedge system to lock the upright bracket:


Once the system is completed, with the nice matching red bottle cage, it is reasonably sturdy. The whole purpose for this particular location is accessibility:


We'll see if this needs to be adjusted some but it is an interesting mount and should serve well to keep the bottles from leaking around the lip. I could see something like this strapped straight to the main-tube! Anyway, for $10- it is worth a try. Stay tuned for the next ride report to know if it will stay there:


The other clamp on bottle mount will have to wait until tomorrow. It's been a long day!

Out for now.

Sunday, January 20, 2008

Meet my big brother

Today started like most days this time of year... gray, cold, "thick" with humidity. PhattKatt had resigned to resting again today. The people left and the beast was eyeing me as it usually does.

When the people came home, a ray of sunshine found it's way into the window. And another... and another... and lo, a w.h.o.l.e patch of blue appeared. Of course I began making noise. And alas, I was again brought out into the light. Whooohooo... we're going riding!

You know your Catrike does this... always wanting... always. Not much different than the beast who watches it. Always waiting for that magic jingle of the leash to set the heart aflame.

The ride was still cool and the clouds were fleeting past the fiery ball in the sky, humidity still thick. But how could someone complain when the roads are nearly dry, the sidewalks empty, and traffic following its own course.

Today was a good day to get out for a short jaunt around the neighborhood.

Meet PhattKatt's bigger brother; the Actionbent trike affectionately known as the ABTT:


I love these surprise outings!

Saturday, January 19, 2008

...old man winter

Winter in the great Northwest is a pussy cat when looking at alternatives. Yet the cabin fever is just as real; as if blizzards were blowing and gales were flooding the streets. At least, we'd have something to watch... but no; a drizzle of rain and a peer of sunshine, and wet streets, and a chill in the air; simply not triking weather... YET!

So the people walked to the store and took their beast (dog) with them. The quest was for me, PhattKatt... to be seen. The people came back with a new and shiny present: The Blackburn MARS 2.0 bike tail light


After an hour of anticipation, finally I was fitted with my new glow:


Just kinda fills in the gap between the SMV triangle and the fluttery flag, now doesn't it? Not that this is unique of course... the *other* trike has one on the flagpole too.

For anyone that cares, these MARS 2.0 lights can be had for quite little as far as rear blinkies go. They run on 2-AAA batteries and have 3 modes... solid, all-blinking or random blinking and includes two amber lights facing forward. You see the little on/off button in the pix above. The mount is made with some strapping tape and an aluminum cable clamp. In order to change the battery, you must remove 4 screws but seems pretty well sealed from the weather.

I hear a little contemplation regarding my gearing was also considered. Not that I am sure fiddling with my good bits is required but this is what I overheard:

The stock gearing on this trike is pretty good. An 11-32 cassette and 30/42/52 chain rings on 130/74bcd crank arms. I'm assuming the cassette is a SRAM PG950 for the moment and the crank set is a 165mm Shimano Ultegra Octalink (v1) setup. Really nice setup. And for what it is worth, 165mm crank arms is not that common on stock trikes.

So the story goes that the SRAM 970 is an 11-34 cassette. Two teeth different providing a lower low. Rumor has it there is one in the house, somewhere.

Rumor also has it that there is a 24T chain ring in the house. But in order to make it viable, other chain rings would need to be replaced. The ultimate combination for the Ultegra crank set is 24/38/46. The third chart below shows that with a 24T chain ring and the 11-34 cassette, the climbing gear would be !13.2 Gear Inches (GI). That's better, lower, than the *other* trike! I'd definitely like to try that one on! Without delay... for your data crunching perusal:


The day that my bits will be messed with are a long ways off so for the moment all we can do is hope for sunny dry days... warmish ones. I hear the bottle cages are coming on Wednesday. Maybe another post awaits on that day. Now for another extended katt-nap.

PhattKatt Out!